Making a needlebook
I have known for some time now that my needles desperately need to be better organized. So I decided I'd start working on something in which I may organize them today. A big honkin' needlebook.
What I've done so far (without pictures, unfortunately) is designed the book itself and cut out two pieces of fabric for the cover. The outer piece had iron-on interfacing applied. I've also cut the cardboard insert and glued the outer piece on. (How am I going to attach the inside cover? Your guess is as good as mine, to be honest. Probably a mix of glue and sewing.) The cover is currently sitting beneath my bible for the corsetry and underwear unit for school, which by now is rather hefty. (Heh, heft. The Collegians founded another cult, and it split into sects, and well, the sect of Hefty Jim is all about the Heft.)
So what I do have pictures of is the design and the fusing tests. Here we go!


The scissor keep pattern was traced onto the outer fabric, and two cut. I sewed them together by hand, turned it out, and sewed up the opening. I'm now sewing it onto the inner cover with a ladder stitch, so it's invisble.


What I've done so far (without pictures, unfortunately) is designed the book itself and cut out two pieces of fabric for the cover. The outer piece had iron-on interfacing applied. I've also cut the cardboard insert and glued the outer piece on. (How am I going to attach the inside cover? Your guess is as good as mine, to be honest. Probably a mix of glue and sewing.) The cover is currently sitting beneath my bible for the corsetry and underwear unit for school, which by now is rather hefty. (Heh, heft. The Collegians founded another cult, and it split into sects, and well, the sect of Hefty Jim is all about the Heft.)
So what I do have pictures of is the design and the fusing tests. Here we go!

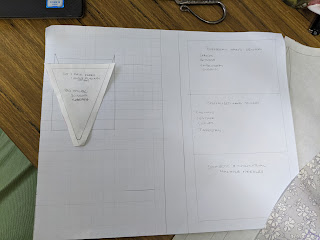
I knew I wanted it lorge. I have a sweet tiny needlebook I made ages ago, and another needle case I'm in the middle of, but I need something that will organize and keep things together so I'm not grabbing the Wrong Needle.
What I've got above is the draft: I figured out how large I wanted it to be (the short side of an A4 paper/21cm by 12cm for the cover, plus a 2cm strip for the spine) and used my grading triangle to make sure the lines were all at right angles. I also lightly (very lightly) drafted lines 1cm apart on the left side so I could position a scissor keep and....I haven't figured out what else yet. Other stuff.
The right side has lines drawn in 1cm from each edge, then the resulting box split into thirds. These will be the individual pages of the book. I'm planning on having three separate sections of pages that I can flip through: general hand-sewing at the top (sharps, betweens, embroidery, straws), more specialized needles in the middle (darners, tapestry, leather, curved), and machine needles at the bottom, both domestic and industrial.


I also ran some glue tests with the fabric I was using for the outer cover, a Liberty of London print that I got ages ago. First, I glued down a cutting from the scrap fabric without interfacing attached. I fused all four of the different interfacings I have to the rest of the scrap and figured out which ones I liked best. The one tossed in the background was far too soft. I ended up choosing the stiffest one, and took a conveniently-sized scrap of a softer one for the scissor keep.
The scissor keep pattern was traced onto the outer fabric, and two cut. I sewed them together by hand, turned it out, and sewed up the opening. I'm now sewing it onto the inner cover with a ladder stitch, so it's invisble.

The plan is to sew everything onto the inner cover before attaching it to the rest of the book. My new thimbles finally came in the mail last week, so I can hand-sew to my heart's content now. (I'd managed to poke a hole into my usual leather thimble, right where I normally push a needle, so that needed fixing.)

The shop I got them from is currently running a 10% off COVID sale, and I can absolutely attest to how lovely these thimbles are (so soft!!) and the lady who runs the shop is also very nice. She was as aghast as I was when she saw the tracking info! The package sat in Chicago, going nowhere, doing nothing, for a full month before it finally made its way onto a plane to Australia. I ordered them on March 28 and finally received them May 14.
Her sizing guide is a little odd, but I got two size smalls and they fit well, if a bit long in the knuckle for my liking. They are so very soft, and so very blue, and they have a Smell, but it's not offensive, just distinct. And kinda...comforting? I think it's just leather-smell, but it's still nice. The size is written on the inside in Sharpie, but she's got a bunch of colors so you can color-code your sizes if you want multiples.

Comments
Post a Comment